NUMARK PARTYMIX PRO
SETUP
STEP 1 : CONNECTIONS
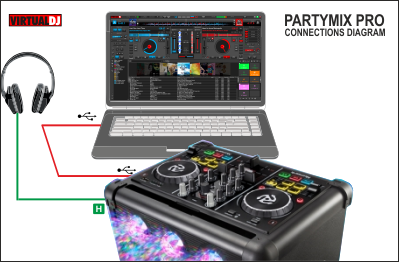
- Connect the PartyMix Pro to a USB port of your computer via the USB socket on the right side panel of the unit.
- Optionally connect the PartyMix Pro to an AC Outlet using the AC socket at the right side panel of the unit. Note that the PartyMix Pro can operate with its rechargeable battery.
- Optionally connect a pair of Headphones at the right-side panel of the unit, using a 1/8" cable or adapter.
STEP 2 : DRIVERS & FIRMWARE
Drivers : No driver is required to be installed. The Party Mix Pro is a USB Class compliant device and your Operating system will automatically install the necessary drivers once the unit is connected to a USB port of your computer.
Firmware : Please visit Numark Party Mix Pro product's page to check for any firmware update
https://www.numark.com/product/party-mix-pro
STEP 3 : VirtualDJ 8 Setup
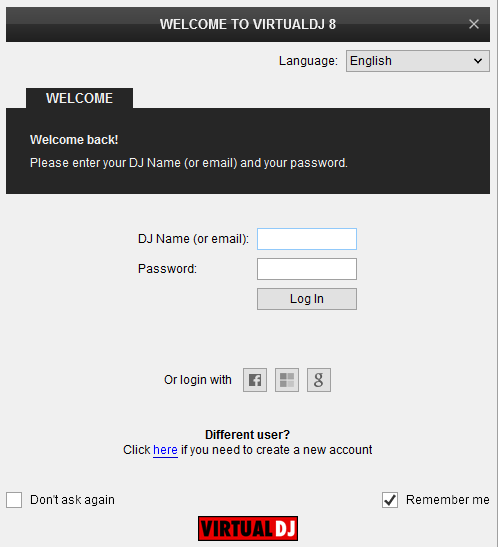
Once VirtualDJ 8 is launched, a Login Window will appear to enter your virtualdj.com account credentials.
A Pro Infinity, a Plus Controller or a Pro Subscription License is required to fully use the Numark Party Mix Pro. Without any of the above Licenses, the controller will operate for 10 minutes each time you restart VirtualDJ.
http://www.virtualdj.com/buy/index.html
The Numark Party Mix Pro is also operating with the bundled VirtualDJ 8 Limited Edition.
Read further about the procedure required for VirtualDJ 8 LE at the Limited Edition Chapter
Click on the "Use Soundcard" in order VirtualDJ to apply the necessary audio configuration and use the built-in sound card and speaker of the PartyMix Pro.
You can still make changes in the Audio setup from VirtualDJ Settings->AUDIO tab.
If VirtualDJ LE or the tailored Party Mix Pro skin are installed, an additional button Change Skin will be available to load the skin, or continue with the default skin of VirtualDJ 8.
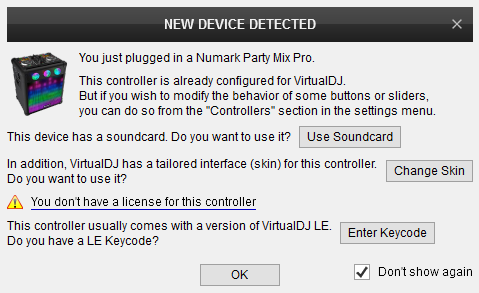
An additional Enter Keycode button will be available, if your Account does not offer a Pro or Plus License or you have skipped the Login process.
Click on this button and enter the Keycode (serial) of your VirtualDJ LE.
Visit https://www.numark.com/my-account/login to obtain your LE Keycode.
Make your selections and press OK.
The unit is now ready to operate.
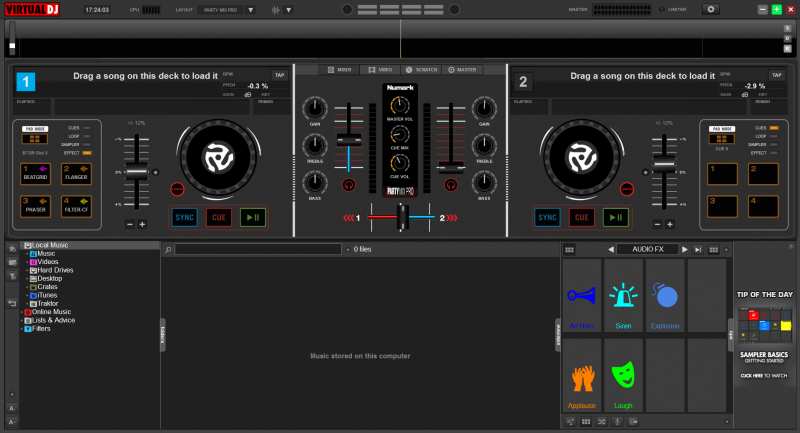
CONTROLS
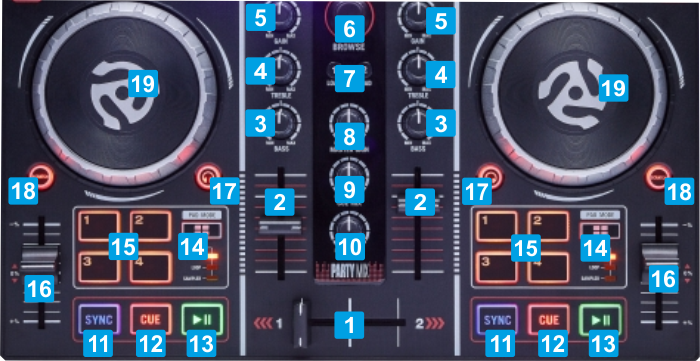
KEY
ACTION
Push to toggle focus between Folders and Songs List.
When in Folders list, push for more than 1 second to expand/collapse sub-folders
Hold for more than 1 second to unload the same deck
Routes decks (when PFL is enabled) to the Headphones Channel
Blends Master Output and Decks (if PFL is enabled) in all other positions
Preview track when paused while button is pressed
Jumps and stops to the Cue point when playing
PADS
The 4 numbered Pads of the Numark PartyMix Pro offer different functionality, depending on the selected Mode. Use the PAD MODES button to cycle through the 4 available modes (Hotcues, Loops, Sampler and Effects).
HOTCUES
The unit will initialize with the Hotcues mode selected. To select the Hotcues mode - if another is selected - use the PAD MODES button until the first top Led (CUE) is lit.
The Hotcues page will be then selected and displayed in both the tailored and the default skins of VirtualDJ
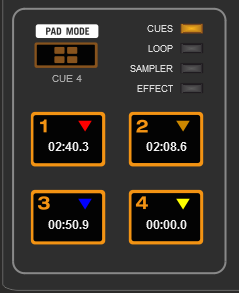
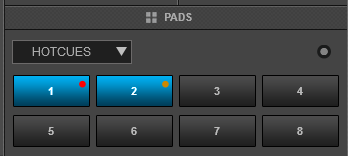
In this mode the 4 numbered Pads assign a Hotcue (1-4) or trigger the Hotcue (if assigned). To delete an assigned Hotcue, right-click on the Hotcue button on the skin.
LOOPS
Use the PAD MODES button until the second from top Led (LOOP) is lit to set the Pads to Loop mode. The special PM Loop page will be then selected and displayed in both the tailored and the default skins of VirtualDJ
Note : The special PM Loop page is only available when the PartyMix Pro is connected
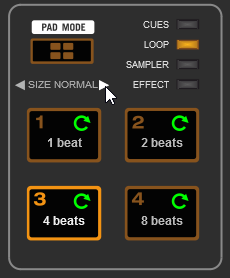
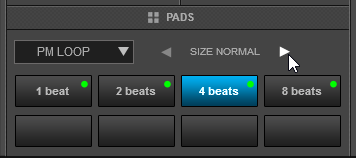
In this mode, the 4 numbered Pads trigger an auto-Loop of a different size in beats, depending on the selected Loop Bank.
3 different Banks are available (Small, Normal and Large) offering loop sizes from 1/8 to 64 beats. Use the arrow buttons on the Skin to select the next/previous Loop bank
SAMPLER
Use the PAD MODES button until the bottom Led (SAMPLE) is lit to set the Pads to Sampler mode. The Sampler page will be then selected and displayed in both the tailored and the default skins of VirtualDJ
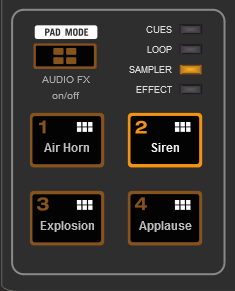
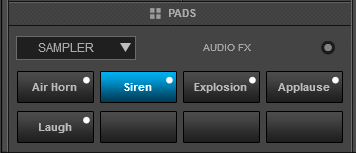
In this mode, the 4 numbered Pads will trigger a Sample (1-4) from the selected Sampler Bank of VirtualDJ.
If the selected Bank has less than 5 samples, both sides of the Party Mix will trigger the same Samples. If the selected Bank has more than 4 Samples, the left side of the PartyMix Pro will trigger samples 1 to 4 and the right side will trigger samples 5 to 8. Samples further to slot 8 can be triggered from the Sampler view of Sideview, either by selecting a different Sampler Layout view or the List view.
See further details about Sampler in VirtualDJ User Guide http://www.virtualdj.com/manuals/virtualdj8/interface/browser/sideview/sampler/index.html
Use the arrow buttons on the skin, to select a different Sampler Bank or choose a different Trigger mode (On/Off, Hold, Stutter or Unmute).
EFFECTS
Use the PAD MODES button until all Leds are lit to set the Pads to Effects mode. The special PM FX page will be then selected and displayed in both the tailored and the default skins of VirtualDJ
Note : The special PM FX page is only available when the PartyMix Pro is connected
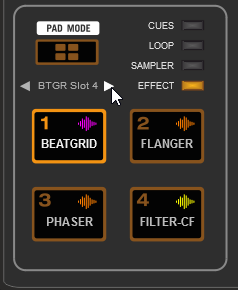
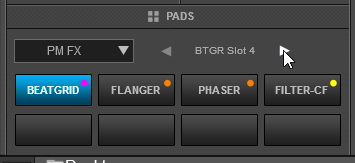
In this mode the 4 numbered Pads trigger an Effect as following:
- PAD 1 : Trigger the Beat Grid Effect. Use the arrow buttons on the skin to select a different Beat Grid pattern
- PAD 2 : Trigger the Flanger Effect.
- PAD 3 : Trigger the Phaser Effect.
- PAD 4 : Enable/Disable the Filter Crossfader mode. When enabled, moving the Crossfader from one side to the other, a High Pass Filter will be applied to both decks as the crossfader is moved, providing a unique mixing.
LIMITED EDITION
The Numark PartyMix Pro comes bundled with VirtualDJ 8 LE (Limited Edition) which allows you to fully control VirtualDJ with your PartyMix Pro right out of the box with just a few limitations
Obtain your VirtualDJ LE keycode
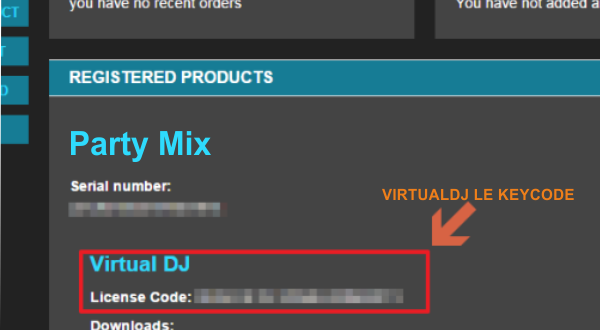
Usually the Keycode (serial) of the VirtualDJ LE is printed either on the sleeve of the VirtualDJ LE CD or at the bottom of the unit. In case of the PartyMix Pro (and other Numark Products), the Keycode needs to be obtained from Numark's website via a Product registration procedure.
- Obtain your VirtualDJ LE keycode (serial) from Numark website.
Visit https://www.numark.com/ and click on My Account or directly visit https://www.numark.com/my-account - Login with email and password if you already have a Numark account or create one
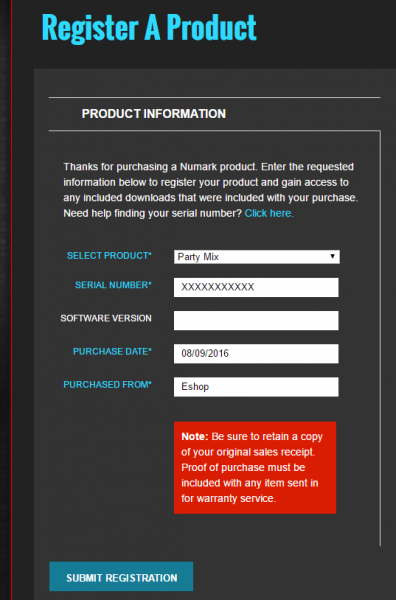
- Once logged in, Click on the Register Product button at the left side of the window
- Register your product by selecting the PartyMix Pro from the Products's lit and providing the serial number of the unit (usually at the bottom of the unit starting with (21), along with all the other purchase information and finally click on the SUBMIT REGISTRATION button.
- In the next page, you will then be able to see your VirtualDJ LE keycode that has the form XXXX-XXXX-XXXX/XXXX. Write that code down or copy that to Clipboard.
VirtualDJ LE Setup
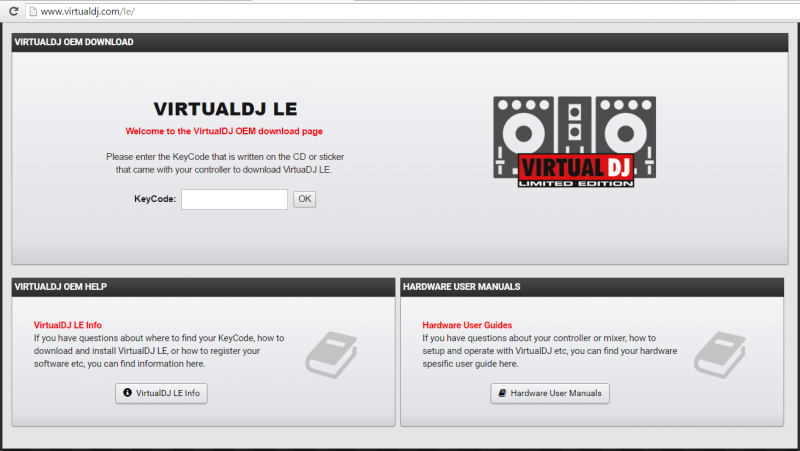
Download and install VirtualDJ LE from our Limited Edition Download page http://www.virtualdj.com/le/ by entering (pasting) your LE Keycode
Find a detailed installation and setup procedure at http://www.virtualdj.com/wiki/VirtualDJ%20LE%20Install%20Guide.html
TAILORED SKIN
A tailored skin is available for the Numark PartyMix Pro offering a perfect match between the Hardware and VirtualDJ functionality. The skin is installed along with the VirtualDJ LE (from http://www.virtualdj.com/le/ ).
If you already have VirtualDJ installed and wish to use the tailored skin without installing the Limited Edition, you can download the skin from http://www.virtualdj.com/plugins/index.html?addonid=80658
Note : The tailored skin is not necessary for the unit to operate, neither adds any functionality to the Hardware.
ADVANCED SETUP
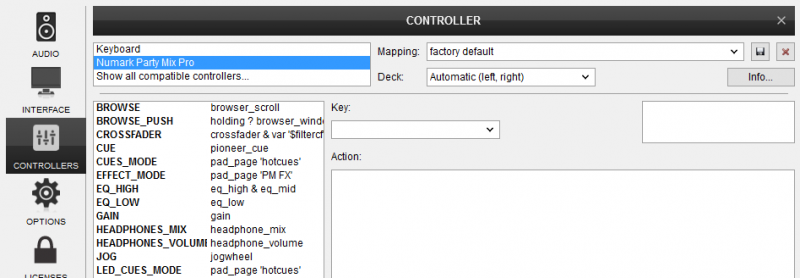
MIDI MAPPING
The unit should be visible in the CONTROLLERS tab of Config and the “factory default” available/selected from the Mappings drop-down list. The factory default Mapping offers the functions described in this Manual, however those can be adjusted to your needs via VDJ Script actions.
Read further details at
http://www.virtualdj.com/manuals/virtualdj8/settings/controllers.html
http://www.virtualdj.com/wiki/VDJ8script.html
AUDIO Setup
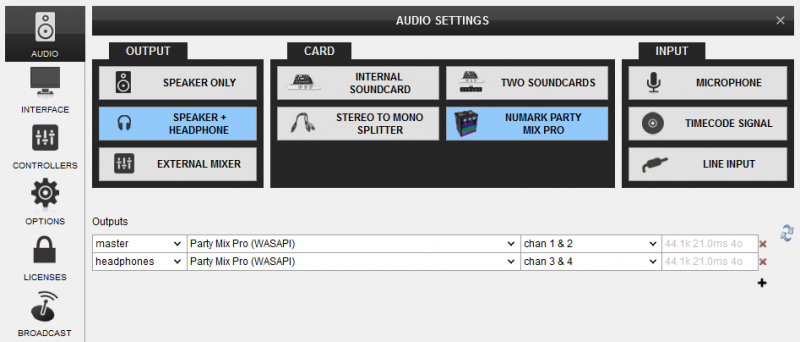
Default Audio setup
The unit has a pre-defined Audio setup and a special button in the AUDIO tab of Config to provide that.
If the pre-defined audio setup is selected, the built-in speaker of the PartyMix Pro will be used for Master Output and your Headphones need to be connected at the side panel of the unit.
Alternative Audio setup
Use a different Speaker/Amplifier.
In case you need to use your own Speakers instead of the built-in of the Party Mix , but still connect your Headphones to the unit for pre-listening, you will need to manually apply the following audio configuration.
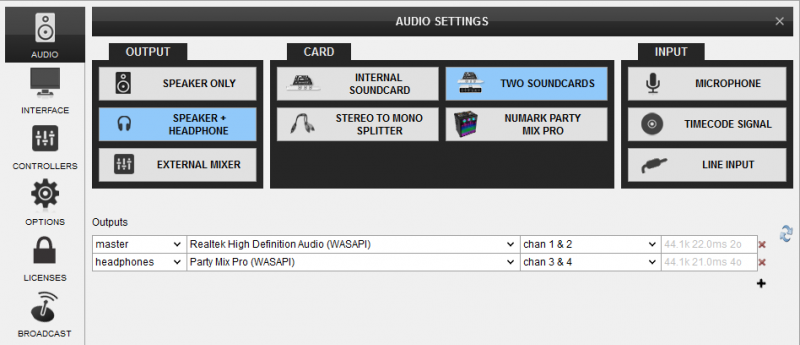
Select the sound card that your speakers are connected to for the Master (on Chans 1,2) and the Party Mix Pro sound card for the Headphones (at Chans 3,4)
Click to APPLY
Note : The Headphones channel in this case will be still routed to the right-side socket of the Party Mix Pro for you to connect your Headphones for pre-listening
For further software settings please refer to the User Guide of VirtualDJ 8. http://www.virtualdj.com/manuals/virtualdj8/index.html
